Blake
Steel Member
Aperture, Shutter speed and ISO
These three terms are vital to be understood if you want to at least get decent shots from your camera. After all, the camera cannot take good photos. YOU have to be able to take good photos. Taking good photos takes time, energy and commitment to learn. Learning is crucial in photography. Learning from your mistakes AND your successes is vital to gain experience and knowledge.
I have only been shooting for a year, that's not long. I don't not see myself as a photography master, nor would I want to. I am not a professional, I have not made 1 cent from selling my photography. But in this first year of photographing many different subject matter I have learnt so much from just shooting, researching and living life. Every aspect of life is seen from a different viewpoint if your are a photographer You start to see the beauty in many things deemed to be dark and monstrous. But enough of all this hippy shit. Let's talk about the exposure triangle.
Aperture, Shutter-speed and ISO
What do these three things have in common? They are all used to obtain a "correct" exposure. The reason I use correct with quotation marks is because there is no "correct way" in photography, there never will be. "correct exposure" is based upon the photographer's interpretation and style.
To understand what all this is for you need to understand stops. I do not want to go into this in this post but here is a very great video on stops. http://www.youtube.com/watch?v=bv0vXD16_lA Adorama creates regular photography videos so I suggest you subscribe to them, as they are really educational.
Aperture, Shutter-speed and ISO are all used to achieve a "correct" exposure, but how? Each of these terms all somehow determine how much light is going to be "fed through" to the sensor. Oh hang on a minute, did I just say "fed through"? Indeed yes, I used this pun on purpose. To segway onto the first factor of the exposure triangle.
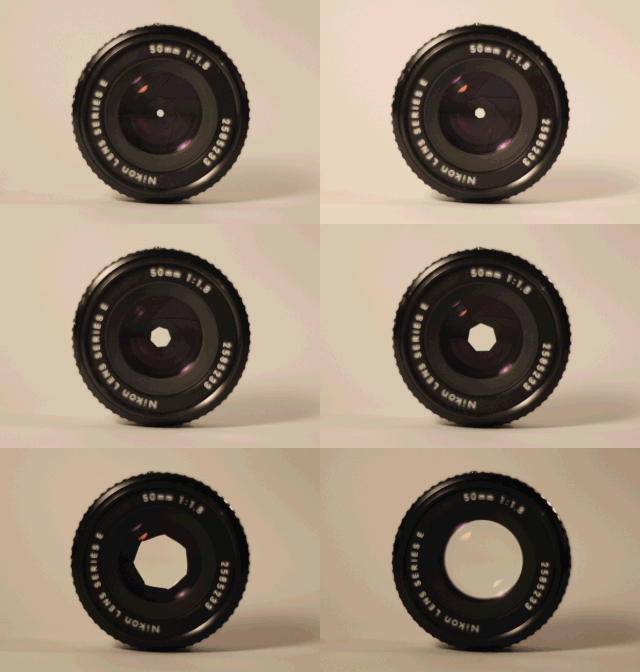
Aperture, what is it? To say it simply, aperture is a small opening that allows light to be passed through a lens and onto a sensor in a camera. But realistically aperture is any sort of hole which let's something through. With an SLR and a DSLR, aperture is able to be changed. Either the lens has the "input" settings for aperture or the camera controls the lens which controls the aperture. An f/stop number "tells you" how much light will be let in. A "higher" f/stop number (smaller is a better word) will indicate that less light would be "fed through" than what a "smaller" f/stop number (larger is a better word) would. Aperture doesn't just affect the exposure but it also varies how much depth your image has (look up depth of field, I'm not talking about it in this post). Please know that focal length plays an important role of how much depth is present in the final image. Here is a little animation demonstrating different aperture settings.

Source:Wikipedia
It is also handy to know that if you double whatever aperture you are at for example, f/8. You get f/16. You just lost 4x the amount of light in which was entering through the lens at f/8. Vice versa, if you halve f/16, you will get f/8 and are letting in 4x more light.
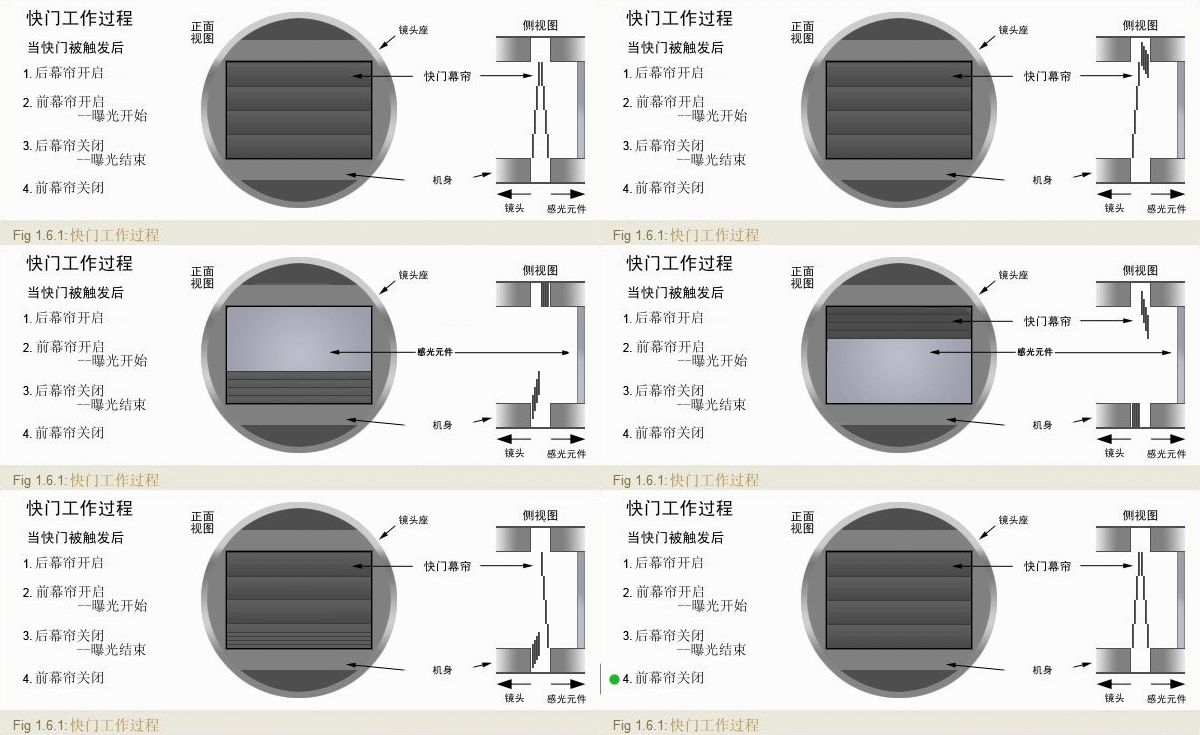
Shutter speed is the duration that light is exposed onto the sensor. Aperture controls how much light coming through the lens, shutter speed controls how long that light that comes through lens is exposed onto the sensor. The shutter is basically like your eyelid.
Here is an animation of what a camera shutter is:

Source:Wikipedia
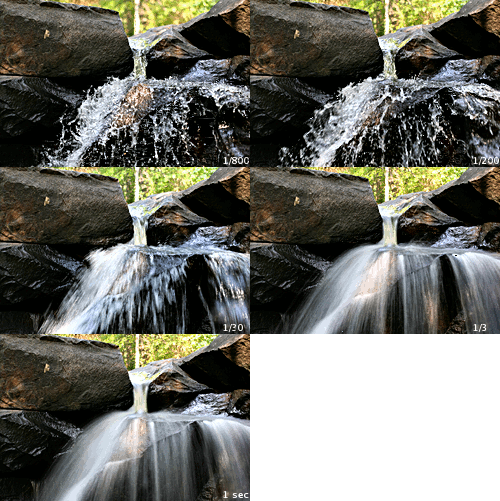
Shutter speed is measured in fractions of a second. For example - 1/250th, 1/500th, 1000th. Shutter speeds can be up to minutes or even hours long, but generally shutter speeds from 30 seconds to 1/8000th are used most often. Shutter speed affects many things, such as if an image will contain a lot of frozen details. Such as many surfing or skating photos. Or even if an image has a lot of motion blurred details such as many seascape or racing car photographs.

Source:Wikipedia
In general you will want to shoot with a higher shutter speed for sports (such as 1/2000th) and a slower shutter speed for blurred water from waterfalls (such as 4 seconds). It also important to know that when shooting handheld you should shoot at least as fast as the inverse of whatever focal length you are shooting at (for people with a 1.6x crop sensor'd camera, like me, you will have to multiply the focal length by 1.6 to get the true focal length in which you are shooting at). When you get to grips with using different shutter speeds you will learn when to step outside the "rules".
Another very handy tip is whatever the shutter speed you are at (let's say 1/200th) if you double 1/200th to get 1/400th, you have halved the time light is let in to the sensor. Vice versa from 1/400th, if you halve that you will end up with 1/200th and double the time letting light through to the sensor.
ISO, this is your camera's sensitivity to light. The higher the number, the more sensitive it is to light. It is better to keep your ISO as low as possible as it introduces grain into your images. The grain from film cameras is much more pleasing to look at compared to digital cameras. Low lighting situations such as in the house or a cave means you will have to increase the ISO. Many cameras today are able to pumped up to extreme ISO's that film photographers couldn't even dream of. Do not let grain detract from getting an image. It is better to get a sharp image with a bit of grain than to get a motion blurred image with no grain. Grain can be removed later but motion blur cannot. As with shutterspeed, if you double your ISO from 100 to 200 you will be doubling the amount of light exposed on to the sensor.
In general, it is best keep your ISO when outside in the daylight to the lowest it can go. You can always use a flash when indoors in order to prevent using a high ISO.
These three aspects of photography are vital to learn. Do not shoot with auto and pray that the camera will pick the right settings for you, you are the brains behind the machine. You need to be able to make the decision, not the camera.
Make sure to check out this link, it will give you a huge understanding of this humongous block of writing I can't believe I just wrote.
http://camerasim.com/camera-simulator/
Do not use this as an extremely detailed guide, this is just an overview. I highly suggest researching exposure more.
PS - Please let me know of any errors I have made in this.
These three terms are vital to be understood if you want to at least get decent shots from your camera. After all, the camera cannot take good photos. YOU have to be able to take good photos. Taking good photos takes time, energy and commitment to learn. Learning is crucial in photography. Learning from your mistakes AND your successes is vital to gain experience and knowledge.
I have only been shooting for a year, that's not long. I don't not see myself as a photography master, nor would I want to. I am not a professional, I have not made 1 cent from selling my photography. But in this first year of photographing many different subject matter I have learnt so much from just shooting, researching and living life. Every aspect of life is seen from a different viewpoint if your are a photographer You start to see the beauty in many things deemed to be dark and monstrous. But enough of all this hippy shit. Let's talk about the exposure triangle.
Aperture, Shutter-speed and ISO
What do these three things have in common? They are all used to obtain a "correct" exposure. The reason I use correct with quotation marks is because there is no "correct way" in photography, there never will be. "correct exposure" is based upon the photographer's interpretation and style.
To understand what all this is for you need to understand stops. I do not want to go into this in this post but here is a very great video on stops. http://www.youtube.com/watch?v=bv0vXD16_lA Adorama creates regular photography videos so I suggest you subscribe to them, as they are really educational.
Aperture, Shutter-speed and ISO are all used to achieve a "correct" exposure, but how? Each of these terms all somehow determine how much light is going to be "fed through" to the sensor. Oh hang on a minute, did I just say "fed through"? Indeed yes, I used this pun on purpose. To segway onto the first factor of the exposure triangle.
Aperture, what is it? To say it simply, aperture is a small opening that allows light to be passed through a lens and onto a sensor in a camera. But realistically aperture is any sort of hole which let's something through. With an SLR and a DSLR, aperture is able to be changed. Either the lens has the "input" settings for aperture or the camera controls the lens which controls the aperture. An f/stop number "tells you" how much light will be let in. A "higher" f/stop number (smaller is a better word) will indicate that less light would be "fed through" than what a "smaller" f/stop number (larger is a better word) would. Aperture doesn't just affect the exposure but it also varies how much depth your image has (look up depth of field, I'm not talking about it in this post). Please know that focal length plays an important role of how much depth is present in the final image. Here is a little animation demonstrating different aperture settings.

Source:Wikipedia
It is also handy to know that if you double whatever aperture you are at for example, f/8. You get f/16. You just lost 4x the amount of light in which was entering through the lens at f/8. Vice versa, if you halve f/16, you will get f/8 and are letting in 4x more light.
Shutter speed is the duration that light is exposed onto the sensor. Aperture controls how much light coming through the lens, shutter speed controls how long that light that comes through lens is exposed onto the sensor. The shutter is basically like your eyelid.
Here is an animation of what a camera shutter is:

Source:Wikipedia
Shutter speed is measured in fractions of a second. For example - 1/250th, 1/500th, 1000th. Shutter speeds can be up to minutes or even hours long, but generally shutter speeds from 30 seconds to 1/8000th are used most often. Shutter speed affects many things, such as if an image will contain a lot of frozen details. Such as many surfing or skating photos. Or even if an image has a lot of motion blurred details such as many seascape or racing car photographs.

Source:Wikipedia
In general you will want to shoot with a higher shutter speed for sports (such as 1/2000th) and a slower shutter speed for blurred water from waterfalls (such as 4 seconds). It also important to know that when shooting handheld you should shoot at least as fast as the inverse of whatever focal length you are shooting at (for people with a 1.6x crop sensor'd camera, like me, you will have to multiply the focal length by 1.6 to get the true focal length in which you are shooting at). When you get to grips with using different shutter speeds you will learn when to step outside the "rules".
Another very handy tip is whatever the shutter speed you are at (let's say 1/200th) if you double 1/200th to get 1/400th, you have halved the time light is let in to the sensor. Vice versa from 1/400th, if you halve that you will end up with 1/200th and double the time letting light through to the sensor.
ISO, this is your camera's sensitivity to light. The higher the number, the more sensitive it is to light. It is better to keep your ISO as low as possible as it introduces grain into your images. The grain from film cameras is much more pleasing to look at compared to digital cameras. Low lighting situations such as in the house or a cave means you will have to increase the ISO. Many cameras today are able to pumped up to extreme ISO's that film photographers couldn't even dream of. Do not let grain detract from getting an image. It is better to get a sharp image with a bit of grain than to get a motion blurred image with no grain. Grain can be removed later but motion blur cannot. As with shutterspeed, if you double your ISO from 100 to 200 you will be doubling the amount of light exposed on to the sensor.
In general, it is best keep your ISO when outside in the daylight to the lowest it can go. You can always use a flash when indoors in order to prevent using a high ISO.
These three aspects of photography are vital to learn. Do not shoot with auto and pray that the camera will pick the right settings for you, you are the brains behind the machine. You need to be able to make the decision, not the camera.
Make sure to check out this link, it will give you a huge understanding of this humongous block of writing I can't believe I just wrote.
http://camerasim.com/camera-simulator/
Do not use this as an extremely detailed guide, this is just an overview. I highly suggest researching exposure more.
PS - Please let me know of any errors I have made in this.
