
So a few of you are thinking of shooting video (or already started) with a DSLR. So I thought I would give some quick tips for everyone.
PART ONE:
Advantages of DSLR Video:
Your going to be getting the same effect as a camera with a DOF adapter (Depth Of Field)
Professionals pay thousands of dollars to create DOF rigs for their cameras, and your getting the same effect for hopefully less then $2000.
Along with the advantage of SLR lenses, your going to producing video that can range from 480p (Best recommended for DVD's of team videos or other shenanigans) to 1080p (amazing for anything web based, or Blue-ray)
Disadvantages and Costs of DSLR Video:
You might find yourself investing more money then what you had originally planned when you purchased your DSLR.
A good amount of VX and DVX users are going to discover that DSLRs don't come with a ND Filter. This means your going to have to dish-out and pay $100 to $200 (depending on the size of your lenses) for a decent ND filter for your camera. Without it, your footage is going to be extremely over exposed and annoying to work with on the field.
Next is the eye piece. Your going to find it difficult to focus and get a good shot while looking through the little piece of plastic and glass. Its likely you'll try using the LCD screen the majority of the time, but the LCD screen itself comes with its own problems. Its uncomfortable to shoot long lens as you hold the screen to your face and you will be constantly running into glare when outdoors.
The only way to combat this is with the Z-Finder.
http://store.zacuto.com/Z-Finder.html

This is a industry standard at the moment with DSLR video. Sadly, its going to rack you up another $200 to $300. (But you'll usually receive a few free goodies, like the shoe-mount out door light my co-worker received.)
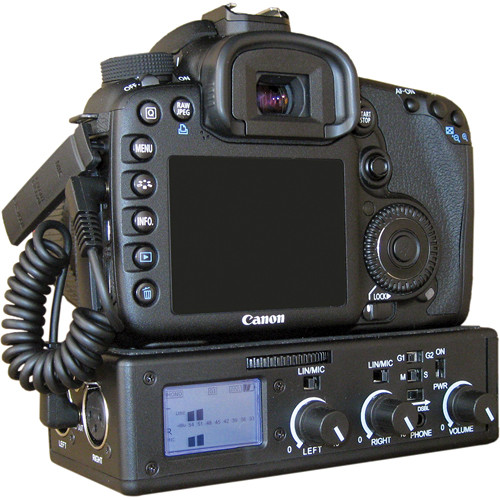
Now lets move onto sound. The noise you get out of this thing is horrible. Experienced filmers will discover that you have no control over the sound channels. There is also no XLR ports for a good high quality microphone. With this said, if your filming for a team DVD and your worried about production value, your going to need an XLR adapter.
Your best bet is the Beachtek adapter. Its sadly going to run you another $250 to $400 (depending on where you buy it, or its used or new.) But your going to be getting what you paid for. This thing is amazing as far as control goes, and its body is pretty light! So don't worry about it weighing you down to much like a battery grip.
http://www.bhphotovideo.com/c/product/674341-REG/Beachtek_DXA_5DA_DXA_5DA_DSLR_Cameras_Passive.html
With that said, your going to run into a conflict. You might have to choose between this, and a battery grip. Most people prefer the extra battery life and the second grip that provides a much steadier shot. But if you want to get the best bang for your buck, (and you can handle changing batteries more often) I recommend the adapter. Plus you can always rest your under it for a little extra support while shooting if you really need it.
Editing and Compressing Footage:
Now lets move away from all the equipment and talk about the actual footage. If no one told you, DSLRs are not 3CCD video cameras. This means your going to have to deal with rolling shutter, and a few other disadvantages of CMOS image sensors. You might also notice you will need a good system to edit and run any HD footage from DSLRs. But honestly, most of you guys have pretty decent computers, I mean a good amount of you have moved onto HD video.
The next thing (and I know people have this problem a lot) is compressing HD footage from a DSLR. Now I'm not sure what your operating system is, or what program your using, but I'll do my best to help you guys out.
Final Cut - Now hopefully most of you know how to setup your footage on a sequence if your using Final Cut, but it should ask you if you want Final Cut to set up the footage for you when its dropped into the sequence. When your ready to export and compress the footage, you will want to click export and then choose Quicktime Conversion. In the options, make sure you have the h.264 codec selected, make sure the export frame size is the same as you video. If you exporting and putting the video on YouTube, drag quality bar to full. If its for Vimeo, make sure the quality is not to high so it doesn't exceed the 500mb limit.
If your exporting footage for DVD, use the same process above, but make sure the codec is ProTools. Its honestly the best codec for DVD. (But don't try uploading it online, it wont work haha)
Here is a good example of 720p footage filmed by my co-worker, this was exported and compressed with the same process (with the H.264 codec) I explained above.
http://www.vimeo.com/14125783
Premiere:
This pretty much the same process, but premieres interface is waaay different. When exporting, make sure you have the preset selected for DSLR video (they specifically made presets for it) make sure you have the H.264 codec selected. (Also, ProTools is only available on Final Cut Pro) Then adjust your quality settings to whatever site your uploading too.
(I don't have any footage made in premiere, haha sorry. If I get any I'll upload it for you guys.)
Vegas:
I don't have a fucking clue when it comes to Vegas and HD video haha. I work on a Mac so I'm somewhat at a disadvantage!
-----------------------------------------
I'm working on the rest as we speak, so I'll post it soon. Hope this helps some of you guys.
PART ONE:
Advantages of DSLR Video:
Your going to be getting the same effect as a camera with a DOF adapter (Depth Of Field)
Professionals pay thousands of dollars to create DOF rigs for their cameras, and your getting the same effect for hopefully less then $2000.
Along with the advantage of SLR lenses, your going to producing video that can range from 480p (Best recommended for DVD's of team videos or other shenanigans) to 1080p (amazing for anything web based, or Blue-ray)
Disadvantages and Costs of DSLR Video:
You might find yourself investing more money then what you had originally planned when you purchased your DSLR.
A good amount of VX and DVX users are going to discover that DSLRs don't come with a ND Filter. This means your going to have to dish-out and pay $100 to $200 (depending on the size of your lenses) for a decent ND filter for your camera. Without it, your footage is going to be extremely over exposed and annoying to work with on the field.
Next is the eye piece. Your going to find it difficult to focus and get a good shot while looking through the little piece of plastic and glass. Its likely you'll try using the LCD screen the majority of the time, but the LCD screen itself comes with its own problems. Its uncomfortable to shoot long lens as you hold the screen to your face and you will be constantly running into glare when outdoors.
The only way to combat this is with the Z-Finder.
http://store.zacuto.com/Z-Finder.html
This is a industry standard at the moment with DSLR video. Sadly, its going to rack you up another $200 to $300. (But you'll usually receive a few free goodies, like the shoe-mount out door light my co-worker received.)
Now lets move onto sound. The noise you get out of this thing is horrible. Experienced filmers will discover that you have no control over the sound channels. There is also no XLR ports for a good high quality microphone. With this said, if your filming for a team DVD and your worried about production value, your going to need an XLR adapter.
Your best bet is the Beachtek adapter. Its sadly going to run you another $250 to $400 (depending on where you buy it, or its used or new.) But your going to be getting what you paid for. This thing is amazing as far as control goes, and its body is pretty light! So don't worry about it weighing you down to much like a battery grip.
http://www.bhphotovideo.com/c/product/674341-REG/Beachtek_DXA_5DA_DXA_5DA_DSLR_Cameras_Passive.html
With that said, your going to run into a conflict. You might have to choose between this, and a battery grip. Most people prefer the extra battery life and the second grip that provides a much steadier shot. But if you want to get the best bang for your buck, (and you can handle changing batteries more often) I recommend the adapter. Plus you can always rest your under it for a little extra support while shooting if you really need it.
Editing and Compressing Footage:
Now lets move away from all the equipment and talk about the actual footage. If no one told you, DSLRs are not 3CCD video cameras. This means your going to have to deal with rolling shutter, and a few other disadvantages of CMOS image sensors. You might also notice you will need a good system to edit and run any HD footage from DSLRs. But honestly, most of you guys have pretty decent computers, I mean a good amount of you have moved onto HD video.
The next thing (and I know people have this problem a lot) is compressing HD footage from a DSLR. Now I'm not sure what your operating system is, or what program your using, but I'll do my best to help you guys out.
Final Cut - Now hopefully most of you know how to setup your footage on a sequence if your using Final Cut, but it should ask you if you want Final Cut to set up the footage for you when its dropped into the sequence. When your ready to export and compress the footage, you will want to click export and then choose Quicktime Conversion. In the options, make sure you have the h.264 codec selected, make sure the export frame size is the same as you video. If you exporting and putting the video on YouTube, drag quality bar to full. If its for Vimeo, make sure the quality is not to high so it doesn't exceed the 500mb limit.
If your exporting footage for DVD, use the same process above, but make sure the codec is ProTools. Its honestly the best codec for DVD. (But don't try uploading it online, it wont work haha)
Here is a good example of 720p footage filmed by my co-worker, this was exported and compressed with the same process (with the H.264 codec) I explained above.
http://www.vimeo.com/14125783
Premiere:
This pretty much the same process, but premieres interface is waaay different. When exporting, make sure you have the preset selected for DSLR video (they specifically made presets for it) make sure you have the H.264 codec selected. (Also, ProTools is only available on Final Cut Pro) Then adjust your quality settings to whatever site your uploading too.
(I don't have any footage made in premiere, haha sorry. If I get any I'll upload it for you guys.)
Vegas:
I don't have a fucking clue when it comes to Vegas and HD video haha. I work on a Mac so I'm somewhat at a disadvantage!
-----------------------------------------
I'm working on the rest as we speak, so I'll post it soon. Hope this helps some of you guys.
")